You don’t need to be a mechanic to maintain brakes. With the right tools for and understanding of how your brakes function, many common brake maintenance tasks are well within reach.
This article guides you through your brake system’s components, how to spot issues early, and which repairs you can handle yourself versus those that require a pro.
What’s Inside Your Brake System?
Your brake system is a network of components working together to stop your car when you press the brake pedal. Main components of your braking system:
- Brake pads: Material that presses against rotors to slow wheels.
- Brake rotors are metal discs that rotate with the wheels and provide a surface for brake pads to grip.
- Brake calipers: Clamps that squeeze the pads against the rotors.
- Brake lines: Hoses and pipes that carry hydraulic fluid from the master cylinder to the brakes.
- Brake fluid: A hydraulic fluid that amplifies the pressure from your foot to the brakes.
- Master cylinder: The pump that sends fluid through the brake lines when you press the brake pedal.
Each braking system component wears out, and early detection can save time, money, and stress.
Signs Your Brakes Need Attention
Your brake system is designed to wear over time. Thankfully, it alerts you when your brake components need attention. Key signals to be aware of for your braking system:
- Squealing or screeching noises: This usually indicate s worn brake pads that need replacing.
- Grinding: Your pads may be completely worn down, allowing metal-on-metal contact.
- A soft or spongy pedal: You could have air in your brake lines or low brake fluid.
- Vibrations while braking: Often caused by warped rotors.
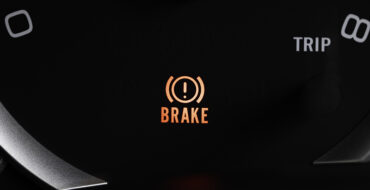
- Brake warning light: Time to inspect your brake system.
The earlier you respond to these signs, the simpler the repairs tend to be.
What You Can Do Yourself
Here’s where the DIY spirit comes in. If you know your way around a car and have the right tools, you can tackle many brake jobs yourself.
Inspecting Your Brake Pads
Check brake pad wear through your wheel spokes or by removing the wheel. Most pads have wear indicators, small metal tabs that create a high-pitched squeal when it’s time to replace your brake pads. If your brake pad material is thinner than 3mm (about the width of two credit cards), it’s time for a change.
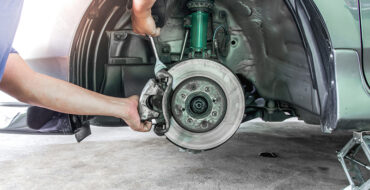
Replacing Your Brake Pads
This is one of the most common and approachable brake jobs. You’ll need:
Once the wheel is off and the caliper is removed, it’s as simple as sliding out the old pads, compressing the caliper piston, and installing the new ones.
Important: Always replace pads on both sides of an axle (left and right) at the same time to keep braking balanced. Find detailed instructions here.
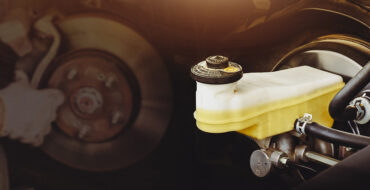
Check and Top Up Your Brake Fluid
Brake fluid is hygroscopic: it absorbs moisture. Replace it every two years or 40,000 km, even if the level looks fine.
Brake fluid is usually stored in a clear reservoir under the hood. If the level is low, check for leaks and top it off with the correct type, which you can find in your owner’s manual.
Bleed Your Brake Lines
If you’ve replaced fluid or the pedal feels soft, bleeding the brakes may be necessary to remove trapped air.
Accomplish this with a brake bleeder kit or with the help of a second person pressing the brake pedal while you open and close the bleeder valve.
Always start with the wheel farthest from the master cylinder.
Inspect Your Rotors
Rotors last longer than brake pads, but do wear down. Look for:
- deep grooves
- rust or scoring
- a “lip” on the edge (sign of thinning)
Warped rotors can cause brake pulsation and may need resurfacing or replacement. Use a micrometer to measure thickness accurately.
When to Leave It to the Pros
A professional inspection can be the best choice, even for skilled DIYers. Here are instances where you should leave brake care to a professional.
- Master cylinder issues: These are rare but critical.
- ABS or brake warning lights: Diagnosing electronic systems requires a scan tool and professional servicing.
- Brake line replacement: Involves bending/flaring lines and bleeding all four corners.
- Uneven braking or pulling: Could be seized calipers, suspension issues, or a bigger alignment problem.
Knowing what not to DIY is as important as knowing what you can handle.
Extra DIY Tips for Clean, Safe Brake Work
- Always work on a cool car: brakes get extremely hot.
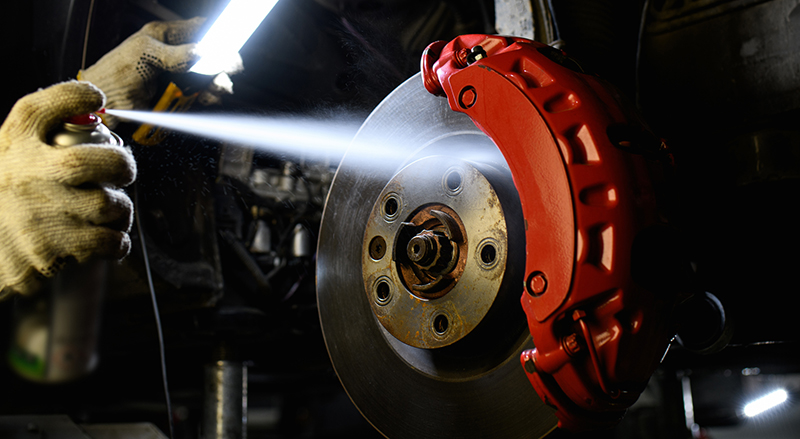
- Use a brake cleaner to clean parts.
- Apply grease only to the backs of pads and caliper hardware, not to pad surfaces or rotors.
- Never reuse old hardware clips unless they’re in excellent shape.
- Torque lug nuts to spec when reinstalling wheels.
Brake Maintenance Basics
DIY brake maintenance can be satisfying, cost-effective, and safe if done carefully with an understanding of how the braking system works. For more information, or to select the right tools for the job, visit your local NAPA Auto Parts store. Our friendly experts will be happy to help!