Over time, your car will pick up its share of dings and scratches. But you don’t have to let these imperfections pile up. To maintain your car’s look and protect it from more serious issues, do some paint correction.
Let’s go over what this process is, why it’s important, and how to get it done.

What is paint correction and why is it necessary?
If you’ve been driving for a while, it’s likely you’ve collected a stone chip or two. Stone chips, also known as rock chips, are small marks on your car’s body caused by gravel and debris flicked up by other cars around you on the road. They’re most common on highways and loose roads and during the winter when the roads are covered with salt. Luckily, these marks are often fixed easily with paint correction, so your car can look good as new.
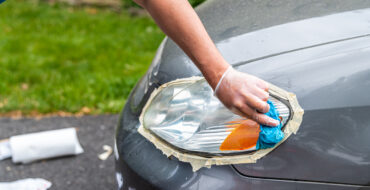
Paint correction removes swirls and minor scratches, such as stone chips, from your vehicle’s surface. With tools like an electric polisher, sandpaper, and a cutting compound, these marks can be corrected as if they never existed.
This task isn’t just superficial, however. While these marks may look insignificant, they can become a bigger problem if left untreated. Stone chips expose your vehicle’s body to rust. If left to build up, rust can lead to expensive repairs. With paint correction, these issues can be deterred.
Professional paint correction vs. DIY
Depending on the severity of your chips, you can learn to DIY paint correction. If you can see rust spots, multiple and/or very large chips, or exposed base metal, leave paint correction to a professional. You can call your local NAPA AUTOPRO service centre to see if they offer this service.
To do your own paint correction on minor scratches, follow these steps:
- First, you need to clean and dry the area so the paint will adhere properly. With soap and water, wash the affected area, then rub down with alcohol. Let it dry before moving to step 2.
- Sand down any raised edges around the chip(s) with a cutting compound or very fine grain wet and dry sandpaper. Take care not to damage the surrounding clear coat.
- Apply the primer or base coat and let dry.
- Apply the paint in thin layers, allowing the paint to dry between layers. Keep the paint within the damaged area.
- Once the paint is dry, sand gently to make it the same level as the surrounding paint. You’ll need very fine grain, wet sandpaper, and a steady hand for this. If you’re gentle, you can use an electric polisher.
- Apply a topcoat or lacquer to seal the repair and leave it to dry.
Paint correction is a long process that takes several hours to complete. When you finish, avoid driving for at least 24 hours. Don’t forget to wear gloves during this task.
Check out this video for more guidance on covering up stone chips.
Avoiding paint correction
Paint correction is a time-consuming (and sometimes expensive) task. To avoid needing it too often, follow these tips to protect your car’s paint:
- Apply paint protection film (expensive, but often worth it for auto enthusiasts).
- Apply a high-quality paint sealant (cheaper than full film and easier to apply).
- Leave a generous distance between yourself and other vehicles when driving.
For any questions about paint correction, visit a NAPA Auto Parts store to speak with an expert.